Here's a photo of a Christmas tree, as seen by my camera's sensor:

The image isn't even black-and-white, it's gray-and-gray: While the sensor's ADC can theoretically output values from 0 to 16382, the data doesn't cover that whole range.

The real range of ADC values from 2110 to 13600. Let's set those values as white and black in the image:
Vnew = (Vold - Black)/(White - Black)
Vnew = (Vold - 2110)/(13600 - 2110)

Much better, but those Christmas lights are still rather monochromatic.
A camera sensor isn't able to see color: It only measures the total brightness hitting each pixel. In a color camera, the pixels are covered by a grid of alternating red, green and blue color filters:

Here's the image with every pixel colored the same as the filter that's on top of it:

This version is more colorful, but each pixel only has one third of its full RGB color. To fix this, I averaged the RGB values each pixel with its neighbors:

... and for the rest of the image:

Most of the image is very dark because monitors don't have as much dynamic range as the human eye: Even if you are using an OLED, the screen still reflects light which limits how black it can get.
There's also another, sneakier factor contributing to this...

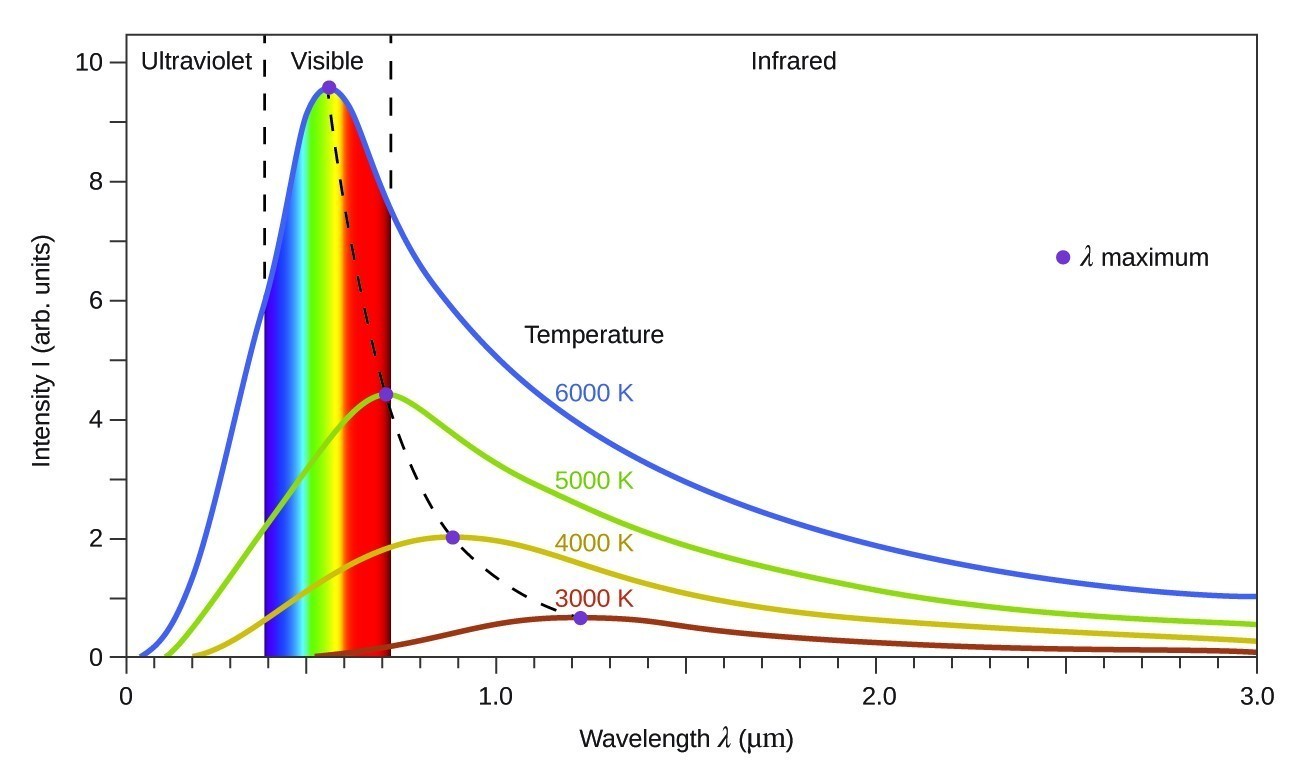
... our perception of brightness is non-linear.
If you were to naively quantize brightness — a requirement to store it on a computer — most of the avalable numbers will be wasted on nearly identical shades-of-white. Because this is a very inefficient use of memory, most color spaces assign extra bins to darker colors. This is what a linear gradient of sRGB colors looks like:

If linear data is displayed directly, the midtones will be much darker than they should be.
Whatever the cause, the darkness can be fixed by applying a non-linear curve to each channel to brighten up the dark areas... but this doesn't quite work out:

Some of this green cast is caused by the camera sensor being intrinsically more sensitive to green light, but some of it is my fault: There are twice as many green pixels in the filter matrix. When I averaged RGB values to demosaic the image, it boosted the green channel even higher.
This needs to be fixed with white-balancing: Multiplying each color channel by a constant to equalize their brightnesses... however, because image's brightness values are now non-linear, I have to go back a step to do this.
This is the linear image from the demosacing step but with the RGB values temporarily scaled up so I can see something:

After some playing around, I was able to get the image looking like this:

... and after re-applying the curve:

This is really just the bare minimum needed for digital photography: I haven't done any color calibration, the white balance isn't perfect, the black point is too high, there's lots of noise that needs to be cleaned up...
Applying the curve to each color channel desaturated the highlights. This effect looks rather good — and is what we've come to expect from film — but it has also de-yellowed the star. It's possible to separate each pixel's luminance and curve that while preserving color.
On its own, this would turn the LED Christmas lights into an overstaturated mess, but combining both methods can produce nice results.
For comparison, here's the image my camera produced from the same data:

Far from being an "unedited" photo: there's a huge amount of work that has gone into making this image.
There's nothing happening when you adjust the contrast or white balance in editing software that the camera doesn't do under the hood. The tweaked image isn't "faker" than the original: they are different renditions of the same data.
Replicating human perception is hard, and it's made harder when constrained to the limitations of display technology or printed images. You don't have to be ashamed about adjusting a photo when automated algorithms make the wrong call.
